iPhone, iPod, iPad has no photos in Windows Explorer

So you’ve decided it’s time to get those precious photos off your iPhone, iPod or iPad and you plug in your device into your Windows PC and no little window opens up asking you what you would like to do?

You don’t think to much of it, and open Windows Explorer to look at the folders on your hard drive and browse to the connected device which is your iPhone, iPod or iPad.

You go to the photos folder expecting to see all your photos and videos and you get a big fat nothing staring back you. Your photos and videos appear to be missing. Just like in this image…

iDevice_MissingPhotos_WindowsExplorer_1

You frantically check on the device and see that all the photos and videos are still on the there, but just not showing in Windows. You breath a sigh of relief.

Unplugging the device and plugging it back in isn’t going to help, but there is no need to worry.

This is an issue with iTunes and the device drivers for Windows. You can uninstall iTunes, reboot, and re-install iTunes (which repairs the drivers), but you don’t have to.

So here’s what you do to get them back.

  1. Disconnect the device from the USB port.
  2. Make sure your device is open and you have entered in the security code.
  3. Connect the device back to the USB port.

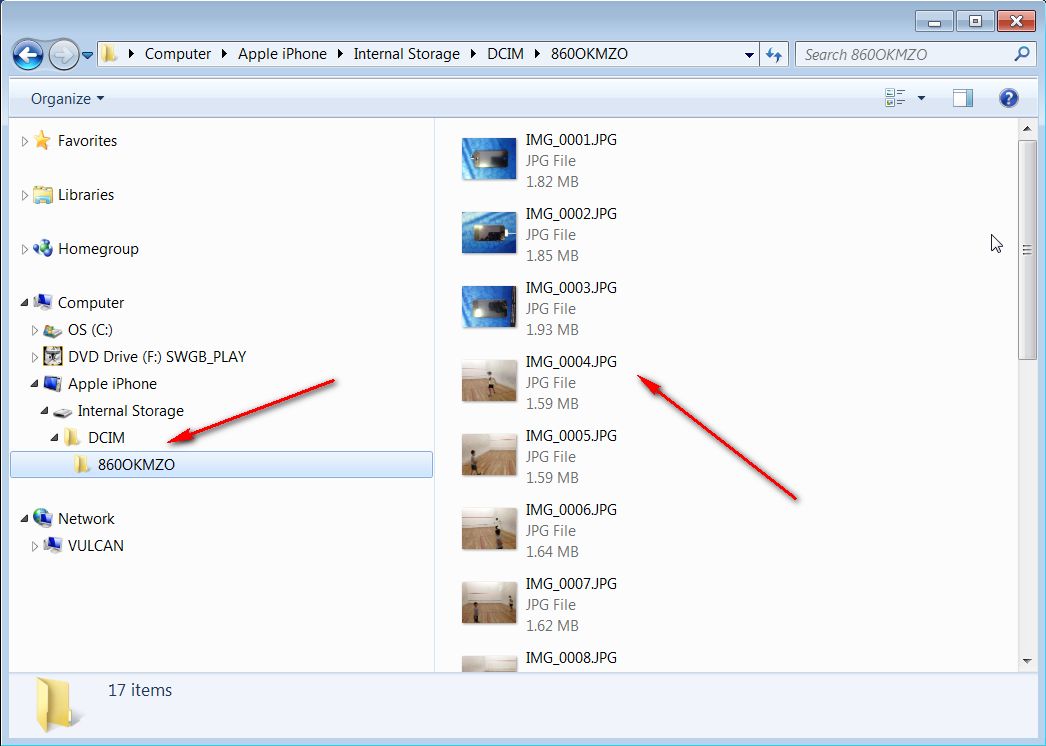
Windows will now be able to see what’s inside your device and give you access to copy the photos and videos off your device. See the image below…

iDevice_MissingPhotos_WindowsExplorer_2

If you don’t want to need to do that everytime you connect your device to your Windows computer then you will need to remove iTunes and re-install iTunes. Which we discuss in this blog post. iPhone, iPod, iPad not Showing in iTunes and Windows Explorer

Posted in How To's, iPad, iPhone, iPod | Tagged , , , , | Comments Off on iPhone, iPod, iPad has no photos in Windows Explorer

iPhone, iPad, iPod Temperature Warning

iOSTempuratureWarning

Temperature warning on iPod on a hot Brisbane day

If you live in Australia and have had an iPhone, iPad, or iPod long enough you may have experienced a temperature warning. With an image on your device that looks like the image in this article.

This can be a once off warning or a sign of a major issue with your device. It also may just be a software glitch.

Being in Australia with temperatures that exceed 35deg in most cities in the whole country during summer, there is a good chance this warning message will appear.

Apple states as follows…

Operate iOS devices where the temperature is between 0º and 35º C (32º to 95º F). Low- or high-temperature conditions might temporarily shorten battery life or cause the device to alter its behavior to regulate its temperature.

Store the device where the temperature is between -20º and 45º C (-4º to 113º F). Don’t leave the device in your car, because temperatures in parked cars can exceed this range.

Once the device shows this temperature warning you should let the device cool down as quickly as possible. Move it into a cooler area and switch it off for awhile.

If after 30 minutes or so (giving it time to cool down), when you turn it back on you still have the temperature warning, you may have to get the device looked at by a repairer.

If the temperature warning is gone then use as per normal.

If you get repeated temperature warnings and you are not in hot environment, then you should get the device looked at by a repairer.

You can guess of course the repairer that we recommend you contact….. that’s right. Us. Phone Repair Doctor

Posted in How To's, iPad, iPhone, iPod | Tagged , , , | Comments Off on iPhone, iPad, iPod Temperature Warning

How to Import SIM contacts into Your iPhone

A common question among new iPhone users is “How do I import my old SIM contacts into my iPhone.?”

While this seems like a simple task to just re-enter all your contacts one at a time manually, if you’ve got a lot of contacts then you are going to waste a lot of time.

The initial iPhone running under IOS version 2 didn’t have an import feature, but all new iPhones have the import SIM contacts feature.

So here’s how to do it.

Go to “Settings” >> “Mail, Contacts, Calendars” >> scroll down until you see “Import SIM Contacts” then click that button.

This will import all your SIM contacts to your contacts list in the iPhone. The contacts on the iPhone are stored in internal memory and not on the SIM card.

iPhone_ImportSIM1

iPhone_ImportSIM2

iPhone_ImportSIM3

iPhone_ImportSIM4

If you wish to move your contacts from your iPhone to another device then the process is a bit more involved.

You have 2 options.

  1. Use an App such as Synkontact which import / exports contacts between iPhone and Android
  2. Use iTunes to sync your contacts using Google or Yahoo contacts, then both iPhone and Android have access to those contacts
Posted in How To's, iPhone | Tagged , | Comments Off on How to Import SIM contacts into Your iPhone

How to Backup / Restore your iPhone, iPod, or iPad?

As much as we like to think that losing data from our iPhone, iPod, or iPad can only happen to someone else, it can and does happen, and you should be prepared and protect your data by backing up your devices as often as you can.

The good news is the Apple have made backing up your device very easy. Every time that you plug your device into your computer and iTunes sync’s to your device, it does a backup.

The other alternative (only if you are running iOS 5) is to backup using iCloud. You get 5GB of free iCloud storage from Apple, you purchase more space if you need it. For iPhone 3G, 3GS users iTunes sync is your only option.

To use the iCloud method you need to enable it on your device first. “Settings > iCloud > Backup & Storage”, it will run on a daily basis when your device is connected to the internet on Wi-Fi, connected to a power source, and the screen is in locked mode. If you use iCloud for backups, the iTunes method will no longer backup your data. It’s either one or the other.

Backed-up information using both methods includes purchased music, purchased TV shows, purchased books, and apps; photos and video in the Camera Roll; device settings (for example, Phone Favorites, Wallpaper, and Mail, Contacts, Calendar accounts); app data; Home screen and app organization; Messages (iMessage, SMS, and MMS), ringtones, and more.

Probably the largest part of your data that is not backed up is the media files synced from your computer, such as music, video and podcasts, but these can be restored by syncing directly with iTunes on your computer.

The best advice is to make sure you sync regularly and your backups are covered.

All going well you’ll never need to restore from your precious backups, however if do need to restore Apple makes this easy as well.

Just plug your device into your computer and iTunes will start. If your device has been factory reset or is new iTunes will prompt you to restore from your latest backup.

If you need to restore from an iCloud backup you have to get your device into a new state, so that you can be presented with the iOS 5 “Setup Assistant”. Then choose “Restore from iCloud Backup”, and enter your iCloud account and password. It will take some time for all your data to be copied from the iCloud servers back to your device.

If your device still has data on it and is not in a new factory state, then you can right click (or control click) the device that will be listed in your iTunes side menu, and select “Restore from Backup” from the menu. Any backup that is available will be shown to you with the last sync date. This will overwrite what is currently on the device so be sure you want to do this.

Once this is done, double check the settings in iTunes for syncing music, podcasts, emails, etc. Then you can sync as you normally do with Itunes to push all your media, music, video, podcasts, etc, back onto the device.

That’s it, you have restored your device, and you are back in business.

Posted in How To's, iPad, iPhone, iPod | Tagged , , , , | Comments Off on How to Backup / Restore your iPhone, iPod, or iPad?

Getting the most out of your iPod, iPhone and iPad camera

A lot of people nowadays are using their iPhone camera to capture very nice images. You no longer need to carry around a dedicated digital camera for those quick happy snaps. The HD video quality of the iPod, iPhone and iPad is so good you often see people out and about at functions or parties with nothing other than their iPhone or iPad.

So how to do you get the most out of your iPod, iPhone, iPad camera. There are effective techniques and sophisticated apps to help you capture and process images and produce the best results possible.

Keep it Steady

This one is simple, but a must with a fixed lens camera. The shutter speed is fairly slow. So it could be helpful to brace your hand against something solid while the shot is being taken. You can use a tripod holder or adapter for your device. See the images below. You just let your iPhone slip easily and snugly into the holder for mounting the iPhone to any tripod.

Tap to Focus

Make sure your subject matter is in focus. iPhone has an autofocus but you can also tap on the subject to re-focus the camera. Even though the camera has respectable macro ability which can really focus close to the subject, don’t get too close you will end up with a blurry photo.

Don’t Zoom In Too Far

Try to get closer to the subject if you can. When you are zooming in too far, you are enlarging the pixels and will end up with an image full of noise because iPhone cameras have only fixed lenses. This is very true among lower resolution cameras like that of 3G and 3Gs.

Use Apps

Several great apps are available that you can use to enhance your photo. You can try 360 Panaroma, Photogene, Pro HDR and Autostitch. These apps allow you to do different adjustments and it can generate scenes out of diverse photos and join it together.

Lens Attachment

There are various lenses that you can attach to your iPhone camera. Fisheye and wide angled lenses which lets you snap on with the use of magnetic rings that you can stick to your phone. You can also opt to employ a telephoto lens wherein you can screw it into a handy iPhone tripod. You will surely enjoy very nice photos and videos from afar especially in low light levels like concerts.

Videos

If you think you will be making lots of videos from your iPhone photos, it is recommended that you invest for apple’s iMovie app. This is the mobile version of the Apple’s popular consumer video editing on Mac OS X. It offers countless creative and editing functionality right there in your handset.

In summary, experiment with your camera and get comfortable with what it can and can’t do. Use 3rd party tools to enchance it’s abilities. And as long as you have the creativity, you can always get the most out of your iPod, iPhone and iPad camera.


Posted in Articles, iPad, iPhone, iPod | Tagged , , , | Comments Off on Getting the most out of your iPod, iPhone and iPad camera